Thursday, June 25, 2015

Generating JSON Schema from XSD with JAXB and Jackson

In this post, I demonstrate one approach for generating JSON Schema from an XML Schema (XSD). While providing an overview of an approach for creating JSON Schema from XML Schema, this post also demonstrates use of a JAXB implementation (xjc version 2.2.12-b150331.1824 bundled with JDK 9 [build 1.9.0-ea-b68]) and of a JSON/Java binding implementation (Jackson 2.5.4).

The steps of this approach for generating JSON Schema from an XSD can be summarized as:

  1. Apply JAXB's xjc compiler to generate Java classes from XML Schema (XSD).
  2. Apply Jackson to generate JSON schema from JAXB-generated Java classes.

Generating Java Classes from XSD with JAXB's xjc

For purposes of this discussion, I'll be using the simple Food.xsd used in my previous blog post A JAXB Nuance: String Versus Enum from Enumerated Restricted XSD String. For convenience, I have reproduced that simple schema here without the XML comments specific to that earlier blog post:

Food.xsd
<?xml version="1.0" encoding="utf-8"?>
<xs:schema xmlns:xs="http://www.w3.org/2001/XMLSchema"
           xmlns:dustin="http://marxsoftware.blogspot.com/foodxml"
           targetNamespace="http://marxsoftware.blogspot.com/foodxml"
           elementFormDefault="qualified"
           attributeFormDefault="unqualified">

   <xs:element name="Food">
      <xs:complexType>
         <xs:sequence>
            <xs:element name="Vegetable" type="dustin:Vegetable" />
            <xs:element ref="dustin:Fruit" />
            <xs:element name="Dessert" type="dustin:Dessert" />
         </xs:sequence>
      </xs:complexType>
   </xs:element>

   <xs:simpleType name="Vegetable">
      <xs:restriction base="xs:string">
         <xs:enumeration value="Carrot"/>
         <xs:enumeration value="Squash"/>
         <xs:enumeration value="Spinach"/>
         <xs:enumeration value="Celery"/>
      </xs:restriction>
   </xs:simpleType>

   <xs:element name="Fruit">
      <xs:simpleType>
         <xs:restriction base="xs:string">
            <xs:enumeration value="Watermelon"/>
            <xs:enumeration value="Apple"/>
            <xs:enumeration value="Orange"/>
            <xs:enumeration value="Grape"/>
         </xs:restriction>
      </xs:simpleType>
   </xs:element>

   <xs:simpleType name="Dessert">
      <xs:restriction base="xs:string">
         <xs:enumeration value="Pie"/>
         <xs:enumeration value="Cake"/>
         <xs:enumeration value="Ice Cream"/>
      </xs:restriction>
   </xs:simpleType>

</xs:schema>

It is easy to use the xjc command line tool provided by the JDK-provided JAXB implementation to generate Java classes corresponding to this XSD. The next screen snapshot shows this process using the command:

      xjc -d jaxb .\Food.xsd

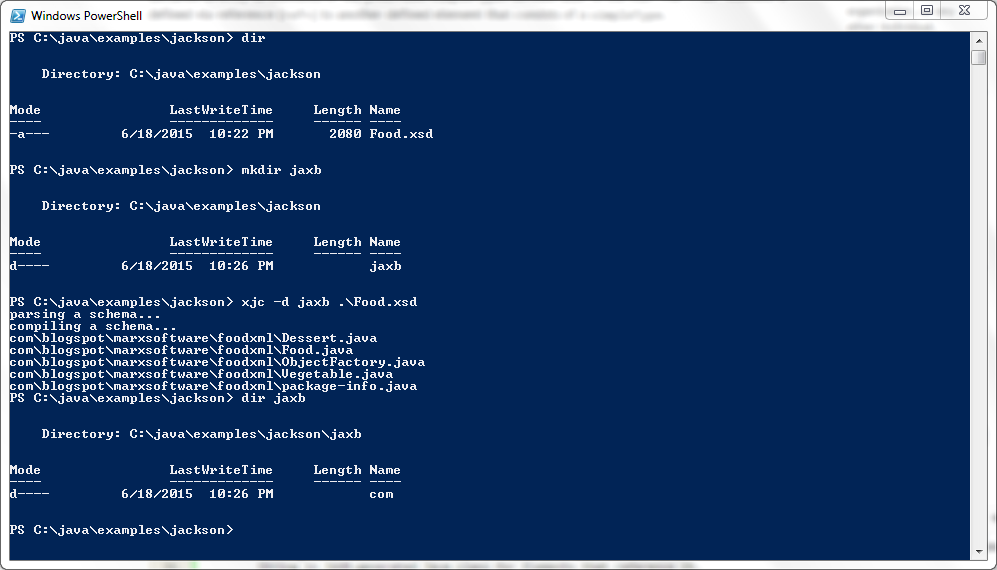
This simple command generates Java classes corresponding to the provided Food.xsd and places those classes in the specified "jaxb" subdirectory.

Generating JSON from JAXB-Generated Classes with Jackson

With the JAXB-generated classes now available, Jackson can be applied to these classes to generate JSON from the Java classes. Jackson is described on its main portal page as "a multi-purpose Java library for processing" that is "inspired by the quality and variety of XML tooling available for the Java platform." The existence of Jackson and similar frameworks and libraries appears to be one of the reasons that Oracle has dropped the JEP 198 ("Light-Weight JSON API") from Java SE 9. [It's worth noting that Java EE 7 already has built-in JSON support with its implementation of JSR 353 ("Java API for JSON Processing"), which is not associated with JEP 198).]

One of the first steps of applying Jackson to generating JSON from our JAXB-generated Java classes is to acquire and configure an instance of Jackson's ObjectMapper class. One approach for accomplishing this is shown in the next code listing.

Acquiring and Configuring Jackson ObjectMapper for JAXB Serialization/Deserialization
/**
 * Create instance of ObjectMapper with JAXB introspector
 * and default type factory.
 *
 * @return Instance of ObjectMapper with JAXB introspector
 *    and default type factory.
 */
private ObjectMapper createJaxbObjectMapper()
{
   final ObjectMapper mapper = new ObjectMapper();
   final TypeFactory typeFactory = TypeFactory.defaultInstance();
   final AnnotationIntrospector introspector = new JaxbAnnotationIntrospector(typeFactory);
   // make deserializer use JAXB annotations (only)
   mapper.getDeserializationConfig().with(introspector);
   // make serializer use JAXB annotations (only)
   mapper.getSerializationConfig().with(introspector);
   return mapper;
}

The above code listing demonstrates acquiring the Jackson ObjectMapper instance and configuring it to use a default type factory and a JAXB-oriented annotation introspector.

With the Jackson ObjectMapper instantiated and appropriately configured, it's easy to use that ObjectMapper instance to generate JSON from the generated JAXB classes. One way to accomplish this using the deprecated Jackson class JsonSchema is demonstrated in the next code listing.

Generating JSON from Java Classes with Deprecated com.fasterxml.jackson.databind.jsonschema.JsonSchema Class
/**
 * Write JSON Schema to standard output based upon Java source
 * code in class whose fully qualified package and class name
 * have been provided.
 *
 * @param mapper Instance of ObjectMapper from which to
 *     invoke JSON schema generation.
 * @param fullyQualifiedClassName Name of Java class upon
 *    which JSON Schema will be extracted.
 */
private void writeToStandardOutputWithDeprecatedJsonSchema(
   final ObjectMapper mapper, final String fullyQualifiedClassName)
{
   try
   {
      final JsonSchema jsonSchema = mapper.generateJsonSchema(Class.forName(fullyQualifiedClassName));
      out.println(jsonSchema);
   }
   catch (ClassNotFoundException cnfEx)
   {
      err.println("Unable to find class " + fullyQualifiedClassName);
   }
   catch (JsonMappingException jsonEx)
   {
      err.println("Unable to map JSON: " + jsonEx);
   }
}

The code in the above listing instantiates acquires the class definition of the provided Java class (the highest level Food class generated by the JAXB xjc compiler in my example) and passes that reference to the JAXB-generated class to ObjectMapper's generateJsonSchema(Class<?>) method. The deprecated JsonSchema class's toString() implementation is very useful and makes it easy to write out the JSON generated from the JAXB-generated classes.

For purposes of this demonstration, I provide the demonstration driver as a main(String[]) function. That function and the entire class to this point (including methods shown above) is provided in the next code listing.

JsonGenerationFromJaxbClasses.java, Version 1
package dustin.examples.jackson;

import com.fasterxml.jackson.databind.AnnotationIntrospector;
import com.fasterxml.jackson.databind.JsonMappingException;
import com.fasterxml.jackson.databind.ObjectMapper;
import com.fasterxml.jackson.databind.type.TypeFactory;
import com.fasterxml.jackson.module.jaxb.JaxbAnnotationIntrospector;

import com.fasterxml.jackson.databind.jsonschema.JsonSchema;

import static java.lang.System.out;
import static java.lang.System.err;

/**
 * Generates JavaScript Object Notation (JSON) from Java classes
 * with Java API for XML Binding (JAXB) annotations.
 */
public class JsonGenerationFromJaxbClasses
{
   /**
    * Create instance of ObjectMapper with JAXB introspector
    * and default type factory.
    *
    * @return Instance of ObjectMapper with JAXB introspector
    *    and default type factory.
    */
   private ObjectMapper createJaxbObjectMapper()
   {
      final ObjectMapper mapper = new ObjectMapper();
      final TypeFactory typeFactory = TypeFactory.defaultInstance();
      final AnnotationIntrospector introspector = new JaxbAnnotationIntrospector(typeFactory);
      // make deserializer use JAXB annotations (only)
      mapper.getDeserializationConfig().with(introspector);
      // make serializer use JAXB annotations (only)
      mapper.getSerializationConfig().with(introspector);
      return mapper;
   }

   /**
    * Write out JSON Schema based upon Java source code in
    * class whose fully qualified package and class name have
    * been provided.
    *
    * @param mapper Instance of ObjectMapper from which to
    *     invoke JSON schema generation.
    * @param fullyQualifiedClassName Name of Java class upon
    *    which JSON Schema will be extracted.
    */
   private void writeToStandardOutputWithDeprecatedJsonSchema(
      final ObjectMapper mapper, final String fullyQualifiedClassName)
   {
      try
      {
         final JsonSchema jsonSchema = mapper.generateJsonSchema(Class.forName(fullyQualifiedClassName));
         out.println(jsonSchema);
      }
      catch (ClassNotFoundException cnfEx)
      {
         err.println("Unable to find class " + fullyQualifiedClassName);
      }
      catch (JsonMappingException jsonEx)
      {
         err.println("Unable to map JSON: " + jsonEx);
      }
   }

   /**
    * Accepts the fully qualified (full package) name of a
    * Java class with JAXB annotations that will be used to
    * generate a JSON schema.
    *
    * @param arguments One argument expected: fully qualified
    *     package and class name of Java class with JAXB
    *     annotations.
    */
   public static void main(final String[] arguments)
   {
      if (arguments.length < 1)
      {
         err.println("Need to provide the fully qualified name of the highest-level Java class with JAXB annotations.");
         System.exit(-1);
      }
      final JsonGenerationFromJaxbClasses instance = new JsonGenerationFromJaxbClasses();
      final String fullyQualifiedClassName = arguments[0];
      final ObjectMapper objectMapper = instance.createJaxbObjectMapper();
      instance.writeToStandardOutputWithDeprecatedJsonSchema(objectMapper, fullyQualifiedClassName);
   }
}

To run this relatively generic code against the Java classes generated by JAXB's xjc based upon Food.xsd, I need to provide the fully qualified package name and class name of the highest-level generated class. In this case, that's com.blogspot.marxsoftware.foodxml.Food (package name is based on the XSD's namespace because I did not explicitly override that when running xjc). When I run the above code with that fully qualified class name and with the JAXB classes and Jackson libraries on the classpath, I see the following JSON written to standard output.

Generated JSON
{"type":"object","properties":{"vegetable":{"type":"string","enum":["CARROT","SQUASH","SPINACH","CELERY"]},"fruit":{"type":"string"},"dessert":{"type":"string","enum":["PIE","CAKE","ICE_CREAM"]}}}

Humans (which includes many developers) prefer prettier print than what was just shown for the generated JSON. We can tweak the implementation of the demonstration class's method writeToStandardOutputWithDeprecatedJsonSchema(ObjectMapper, String) as shown below to write out indented JSON that better reflects its hierarchical nature. This modified method is shown next.

Modified writeToStandardOutputWithDeprecatedJsonSchema(ObjectMapper, String) to Write Indented JSON
/**
 * Write out indented JSON Schema based upon Java source
 * code in class whose fully qualified package and class
 * name have been provided.
 *
 * @param mapper Instance of ObjectMapper from which to
 *     invoke JSON schema generation.
 * @param fullyQualifiedClassName Name of Java class upon
 *    which JSON Schema will be extracted.
 */
private void writeToStandardOutputWithDeprecatedJsonSchema(
   final ObjectMapper mapper, final String fullyQualifiedClassName)
{
   try
   {
      final JsonSchema jsonSchema = mapper.generateJsonSchema(Class.forName(fullyQualifiedClassName));
      out.println(mapper.writerWithDefaultPrettyPrinter().writeValueAsString(jsonSchema));
   }
   catch (ClassNotFoundException cnfEx)
   {
      err.println("Unable to find class " + fullyQualifiedClassName);
   }
   catch (JsonMappingException jsonEx)
   {
      err.println("Unable to map JSON: " + jsonEx);
   }
   catch (JsonProcessingException jsonEx)
   {
      err.println("Unable to process JSON: " + jsonEx);
   }
}

When I run the demonstration class again with this modified method, the JSON output is more aesthetically pleasing:

Generated JSON with Indentation Communicating Hierarchy
{
  "type" : "object",
  "properties" : {
    "vegetable" : {
      "type" : "string",
      "enum" : [ "CARROT", "SQUASH", "SPINACH", "CELERY" ]
    },
    "fruit" : {
      "type" : "string"
    },
    "dessert" : {
      "type" : "string",
      "enum" : [ "PIE", "CAKE", "ICE_CREAM" ]
    }
  }
}

I have been using Jackson 2.5.4 in this post. The class com.fasterxml.jackson.databind.jsonschema.JsonSchema is deprecated in that version with the comment, "Since 2.2, we recommend use of external JSON Schema generator module." Given that, I now look at using the new preferred approach (Jackson JSON Schema Module approach).

The most significant change is to use the JsonSchema class in the com.fasterxml.jackson.module.jsonSchema package rather than using the JsonSchema class in the com.fasterxml.jackson.databind.jsonschema package. The approaches for obtaining instances of these different versions of JsonSchema classes are also different. The next code listing demonstrates using the newer, preferred approach for generating JSON from Java classes.

Using Jackson's Newer and Preferred com.fasterxml.jackson.module.jsonSchema.JsonSchema
/**
 * Write out JSON Schema based upon Java source code in
 * class whose fully qualified package and class name have
 * been provided. This method uses the newer module JsonSchema
 * class that replaces the deprecated databind JsonSchema.
 *
 * @param fullyQualifiedClassName Name of Java class upon
 *    which JSON Schema will be extracted.
 */
private void writeToStandardOutputWithModuleJsonSchema(
   final String fullyQualifiedClassName)
{
   final SchemaFactoryWrapper visitor = new SchemaFactoryWrapper();
   final ObjectMapper mapper = new ObjectMapper();
   try
   {
      mapper.acceptJsonFormatVisitor(mapper.constructType(Class.forName(fullyQualifiedClassName)), visitor);
      final com.fasterxml.jackson.module.jsonSchema.JsonSchema jsonSchema = visitor.finalSchema();
      out.println(mapper.writerWithDefaultPrettyPrinter().writeValueAsString(jsonSchema));
   }
   catch (ClassNotFoundException cnfEx)
   {
      err.println("Unable to find class " + fullyQualifiedClassName);
   }
   catch (JsonMappingException jsonEx)
   {
      err.println("Unable to map JSON: " + jsonEx);
   }
   catch (JsonProcessingException jsonEx)
   {
      err.println("Unable to process JSON: " + jsonEx);
   }
}

The following table compares usage of the two Jackson JsonSchema classes side-by-side with the deprecated approach shown earlier on the left (adapted a bit for this comparison) and the recommended newer approach on the right. Both generate the same output for the same given Java class from which JSON is to be written.

/**
 * Write out JSON Schema based upon Java source code in
 * class whose fully qualified package and class name have
 * been provided. This method uses the deprecated JsonSchema
 * class in the "databind.jsonschema" package
 * {@see com.fasterxml.jackson.databind.jsonschema}.
 *
 * @param fullyQualifiedClassName Name of Java class upon
 *    which JSON Schema will be extracted.
 */
private void writeToStandardOutputWithDeprecatedDatabindJsonSchema(
   final String fullyQualifiedClassName)
{
   final ObjectMapper mapper = new ObjectMapper();
   try
   {
      final com.fasterxml.jackson.databind.jsonschema.JsonSchema jsonSchema =
         mapper.generateJsonSchema(Class.forName(fullyQualifiedClassName));
      out.println(mapper.writerWithDefaultPrettyPrinter().writeValueAsString(jsonSchema));
   }
   catch (ClassNotFoundException cnfEx)
   {
      err.println("Unable to find class " + fullyQualifiedClassName);
   }
   catch (JsonMappingException jsonEx)
   {
      err.println("Unable to map JSON: " + jsonEx);
   }
   catch (JsonProcessingException jsonEx)
   {
      err.println("Unable to process JSON: " + jsonEx);
   }
}
/**
 * Write out JSON Schema based upon Java source code in
 * class whose fully qualified package and class name have
 * been provided. This method uses the newer module JsonSchema
 * class that replaces the deprecated databind JsonSchema.
 *
 * @param fullyQualifiedClassName Name of Java class upon
 *    which JSON Schema will be extracted.
 */
private void writeToStandardOutputWithModuleJsonSchema(
   final String fullyQualifiedClassName)
{
   final SchemaFactoryWrapper visitor = new SchemaFactoryWrapper();
   final ObjectMapper mapper = new ObjectMapper();
   try
   {
      mapper.acceptJsonFormatVisitor(mapper.constructType(Class.forName(fullyQualifiedClassName)), visitor);
      final com.fasterxml.jackson.module.jsonSchema.JsonSchema jsonSchema = visitor.finalSchema();
      out.println(mapper.writerWithDefaultPrettyPrinter().writeValueAsString(jsonSchema));
   }
   catch (ClassNotFoundException cnfEx)
   {
      err.println("Unable to find class " + fullyQualifiedClassName);
   }
   catch (JsonMappingException jsonEx)
   {
      err.println("Unable to map JSON: " + jsonEx);
   }
   catch (JsonProcessingException jsonEx)
   {
      err.println("Unable to process JSON: " + jsonEx);
   }
}

This blog post has shown two approaches using different versions of classes with name JsonSchema provided by Jackson to write JSON based on Java classes generated from an XSD with JAXB's xjc. The overall process demonstrated in this post is one approach for generating JSON Schema from XML Schema.

Tuesday, June 9, 2015

Book Review: Raspberry Pi Essentials

Jack Creasey's Raspberry Pi Essentials (Packt Publishing, April 2015) features 8 chapters spanning approximately 180 substantive pages. The book's subtitle advertises, "Get up and running with the Raspberry Pi to develop captivating projects."

Preface

Packt Publishing books' Prefaces are typically good locations to get an idea of who a particular book is designed for and what the reader should bring to the reading of the book and working a book's examples. The Preface of Raspberry Pi Essentials states that this book "is intended for hobbyists and academic project designers and developers who have minimal experience with programming languages and hardware designs." The Preface also states that NOOBS Version 1.4.0 and Raspbian (Debian Wheezy) Version 7.8 (Linux Kernel 3.18) were used when developing the book's content and references the Raspberry Pi Downloads site.

Chapter 1: Getting Started with Raspberry Pi

The initial chapter of Raspberry Pi Essentials begins by explaining that Raspbian is the "primary operating system" for Raspberry Pi provided by the Raspberry Pi Foundation. The chapter quickly describes the Raspberry Pi as a "complete computer system on a small motherboard."

Raspberry Pi Essentials's first chapter explains why anyone of the several Raspberry Pi models works for the examples in the book and outlines the various ports available on the Raspberry Pi models. The author specifically states, "Although the Pi A+, B+, and Model 2-B are used for all of our projects, nothing covered in this book precludes the use of the older A and B models." The chapter discusses the advantage of starting with a Raspberry Pi starter kit and then moves to coverage on configuring Raspberry Pi's power source. I like that this chapter includes multiple photographs that include showing the Raspberry Pi board itself and showing it in the context of a complete development environment.

Sections in Chapter 1 discuss selecting a screen, preparing the SD card, booting the Raspberry Pi for the first time, and dealing with potential issues preventing a display from showing. Chapter 1's section "A quick tour of the desktop" references several useful keyboard shortcuts and demonstrates using the Raspberry Pi web browser to download the source code associated with Raspberry Pi Essentials.

Chapter 2: Configuring the Raspberry Pi Desktop and Software

Raspberry Pi Essentials's second chapter endeavors to "maximize the utility of the desktop graphical tools and develop code for your projects." The chapter covers installing a wireless adapter (including use of Linux lsusb command), using open source network manager wicd, and reserving a static IP address.

Chapter 2's section "Configuring the Raspberry Pi desktop and software" discusses Lightweight X11 Desktop Environment (LXDE) and Openbox. Other sections introduce commands for keeping the environment up-to-date, for installing a screensaver package, and creating a desktop shortcut that allows for easy locking of the screen. Sections of this chapter cover installing the PCManFM file manager and configuring root privileges.

The second chapter's section "Programming on the Raspberry Pi" summarizes programming languages directly available with Raspbian: Bash, C, Python 2, and Python 3. The project that demonstrates Bash is a talking clock that uses cron, mpg123, Leafpad Text Editor, and gnome-schedule. The project demonstrating Python 3 introduces IDLE3 ("GUI development environment for Python 3).

Chapter 3: Raspberry Pi and Cameras

Chapter 3 of Raspberry Pi Essentials begins with an overview on "connecting cameras to the Raspberry Pi" and highlights the differences between MIPI Camera Serial Interface (CSI) and USB camera connections in text and in a performance characteristics table. The chapter introduces the cameras PiCam and PiNoIR. The chapter employs "a project that builds a motion-sensitive security system using multiple cameras" to demonstrate connecting cameras to a Raspberry Pi. The package lucview is used to test the cameras. Turbo mode is also introduced as part of this project and is covered in more detail in Chapter 4. This project-heavy chapter also features projects for "combining the webcam movement detector and the PiCam camera" (using LeafPad) and "creating a simple Python GUI for the security application" (using TkInter). These projects don't include full code listings, but instead reference where the code can be downloaded from and then explains what to modify in the downloaded code.

Chapter 4: Raspberry Pi Audio Input and Output

Raspberry Pi Essentials's Chapter 4 introduces Raspbian Wheezy and Advanced Linux Sound Architecture (ALSA). The chapter discusses selection of proper headphones for the Raspberry Pi and briefly summarizes and demonstrates three key command-line ALSA utilities (alsamixer, aplay, and arecord). There are sections in this chapter on configuring the default ALSA device and configuring high-quality sound via overclocking.

The projects used in Chapter 4 to illustrate concepts are "installing an advanced audio playback application" (introduces VLC media player), "running VLC in the background for the Internet radio" (uses SHOUTcast as example internet radio channel provider), "designing a playlist file for the Internet radio", "parsing the playlist file for the Internet radio," "implementing a Python text interface to VLC," and "implementing a TKinter GUI for the Internet radio." As with other projects covered in the book, there are step-by-step instructions. Code listings are not provided, but rather there are several references to where the necessary code can be downloaded.

Chapter 5: Port Input and Output on the Raspberry Pi

The fifth chapter of Raspberry Pi Essentials starts with an explanation of Raspberry Pi's digital input and output ports. The chapter discusses "driving LEDs as output indicators" and introduces the concept of Charlieplexing with Raspberry Pi and the Python module raspberry-gpio-python.

The "TKinter LED demo" contains 7 "blocks," each of which provides a code listing and associated textual explanation. The "TKinter switch demo" has 3 "blocks" and highlights the need to address switch bouncing. The project that concludes this chapter is to "add a switch interface to the Internet radio."

Chapter 6: Driving I2C Peripherals on the Raspberry Pi

Chapter 6 of Raspberry Pi Essentials discusses "an interface bus that uses a simple message communication protocol that communicates from a master device to a slave device" (I2C or SMBus). The chapter briefly compares and contrasts I2C with SMBus and uses both in examples. This highly technical chapter includes demonstrations and a multi-"block" project to illustrate concepts related to I2C and SMBus. One of the interesting side notes in this chapter is that, at time of the book's writing, the out-of-the-box python-smbus module only works with Python 2.

Chapter 7: Going Mobile with Raspberry Pi

The learning objectives of the seventh chapter of Raspberry Pi Essentials are to "create a command-line interface to the Raspberry Pi" and to "develop mobile power solutions for the Raspberry Pi." An early section of the chapter discusses "connecting from a PC to the Pi using PuTTY on Microsoft Windows." This section describes and illustrates downloading and installing PuTTY. The chapter then discusses "built-in SSH terminal utilities" available in Linux and OSX.

Chapter 7's coverage of batteries compares "primary" batteries to "rechargeable" batteries, explains why rechargeable batteries are more appropriate for a remote Pi system, and provides a table comparing the performance characteristics of "the most common rechargeable battery technologies." This section discusses the need to use a regulator to ensure that "the Pi runs on a regulated 5V power supply" and briefly outlines the three common regulator types for hobbyists. The chapter also introduces some specific batteries that work well with the Raspberry Pi and wraps up with a project "Selecting a project battery capacity."

Chapter 8: Creating a Raspberry Pi Line-following Robot

The final chapter of Raspberry Pi Essentials begins by describing line detection. The author recommends that any reader with no robotics experience might read a little about robotics first and references the Doug Kelley article Line Detection Using a Digital Camera.

A high-level overview of the software portion of the robotics project is presented as the software architecture. Included in this section is a brief explanation of the advantage of writing modular software with an overview of each of the Python modules to be written for the project. After significant discussion on the Python implementation and use of the Python 2 IDLE IDE, the chapter moves onto testing wireless connectivity, assembling the robot, starting up the robot, and navigating the robot. The end of this final chapter also presents the end of the book.

General Observations

  • Raspberry Pi Essentials does not contain many code listings. Instead, there are references to an online resource from which the code listings can be downloaded.
    • This is an advantage for those who don't want to be bothered with the code (want to run it as-is) and for those who would rather read concepts first and look at code separately.
    • Downloaded code can be viewed in a favorite IDE or text editor to enjoy color coded syntax, line numbers, and the ability to easily copy and paste and make modifications.
    • The most significant disadvantage of this approach would be realized when the days comes that this code is no longer available online for download.
    • A secondary disadvantage exists for those who like the text, illustrations, and code to be all in one place.
    • Perhaps the easiest way to download the majority of the code and resources is to download the zipped directory that is available rather than downloading individual chapters' resources.
  • There are several screen snapshots demonstrating graphical tools, screen output, and hardware. These photographs and screen snapshots are clear and illustrate the concepts well.
  • Raspberry Pi Essentials covers several essential aspects of the Raspberry Pi. Much of this is done in an introductory fashion, though the ideas get fairly complex by the end of the book. Some hobbyist background with related technologies or even a little experience with the Raspberry Pi would help a reader get the most out of this book.
  • Raspberry Pi Essentials is a project-centric book. I didn't take the time to complete the projects and I believe that completing the described projects would have made the book much more useful to me. I recommend that anyone reading this book ensure they have access to a Raspberry Pi on which to work the projects and has the ability to allocate some time for completion of each project. The book builds upon previous projects and subdivides several of the larger projects into smaller tasks so that individuals pieces could be accomplished in smaller amounts of time.

Conclusion

Raspberry Pi Essentials uses text, code (included in the book in some cases and downloaded separately in others), graphics, screen snapshots, and projects to introduce essential features of the Raspberry Pi and how to apply those. Although the book is designed for readers with no previous experience, the projects will be easier to accomplish and the concepts easier to understand with some basic familiarity with programming (particularly Python and the Linux operating system) and with hardware (particularly the Raspberry Pi). However, readers without previous experience can likely download and use the code as-is without fully understanding it and can follow the step-by-step instructions to get the projects going.

Thursday, June 4, 2015

Book Review: Learning Raspberry Pi

The subtitle of Samarth Shah's Learning Raspberry Pi (Packt Publishing, 2015) is, "Unlock your creative programming potential by creating web technologies, image processing, electronics- and robotics-based projects using the Raspberry Pi." The book features approximately 225 substantive pages divided into 7 chapters.

Preface

I like that Packt books' prefaces tend to have sections "What you need for this book" and "Who this book is for." These sections provide a good, brief description of who the author was targeting when writing the book and what the author expected the reader to have in terms of knowledge and tools when reading the book. The author writes that Learning Raspberry Pi is written "for computer literate adults coming from a Linux, PC, or Mac desktop and wishing to learn how to create things with the Raspberry Pi." The author adds that readers are assumed to "have a Raspberry Pi with the required peripherals," are assumed to be "able to install and boot an operating system using NOOBS or RAW images," and are assumed to "have some exposure to Linux and familiarity with general programming concepts." For anyone considering this book, reading the Preface's overview of each chapter may also be useful.

Chapter 1: Getting Started with Raspberry Pi

The initial chapter of Learning Raspberry Pi introduces the Raspberry Pi. It provides a table that compares and contrasts different models of the Raspberry Pi before showing a high definition photograph of a Raspberry Pi marked with numbers associated with descriptions of the labeled parts. Chapter 1 includes a section on operating systems supported on Raspberry Pi, recommends use of Raspbian operating system (Debian-based but optimized for Raspberry Pi), and states that Raspbian is the operating system used throughout the examples in the book. The section includes a table of commands for three of the covered operating systems that are useful in working with software and services.

As part of its coverage of operating systems, Chapter 1 describes the steps for installing operating systems on a Raspberry Pi with NOOBS and BerryBoot. Coverage in this chapter covers using Windows or Linux for images and discusses setting up root accounts and using sudo. This comprehensive and detailed chapter also looks at remote management of the Raspberry Pi with SSH, adding a web server, adding PHP, adding WordPress, and other aspects related to deploying a LAMP stack on a Raspberry Pi.

Chapter 2: Developing Web Applications

The second chapter of Learning Raspberry Pi covers developing web applications on Raspberry Pi. There is a section of this chapter that introduces HTML, CSS, JavaScript, and jQuery. As the author states early in the chapter, this section can be skipped by a reader already familiar with these standards and libraries.

The "An introduction to Python" section of the second chapter states that Python "is the official programming language suggested by Raspberry Pi Foundation." This section describes how to use Python on the Raspberry Pi and provides an introduction to Python that covers syntax and data types. The section also introduces the Python microframework Flask.

Chapter 2 concludes with a demonstration of "creating an Internet radio station." This is a relatively extensive example that integrates all the concepts covered in the second chapter and employs Music Player Daemon.

Chapter 3: Introduction to Electronics

Chapter 3 of Learning Raspberry Pi begins with discussion of the flexibility of Raspberry Pi's general purpose input/output (GPIO) pins in connecting "to different sensors and electronic components." The chapter has a section of basic electronics and covers concepts such as charge, current, voltage, resistance, Ohm's law, Kirchhoff's Current Law (KCL), and Kirchhoff's Voltage Law (KVL).

The third chapter's section on generic electronic components introduces resistors, diodes, switches, integrated circuits, sensors, LCDs, wire, and the breadboard. There is also a section on Raspberry Pi specific electronics components that provides details on using these components and introduces C-based WiringPi and the WiringPi Python wrapper.

This chapter concludes with three detailed step-by-step examples of using Raspberry Pi electronics and Python scripts to develop a digital clock, an analog clock, and an e-mail notifier.

Chapter 4: Getting into Robotics

Learning Raspberry Pi's fourth chapter introduces robotics and describes a robot as "a system that contains sensors, control systems, manipulators, power supplies, and software all working together to perform a task." Additional electronics components are introduced in this chapter including motor, multimeter, robotic base, ultrasonic sensor, and Raspberry Pi's camera, battery, and Wifi module. The detailed examples illustrating these concepts are "developing a remote-controlled robot with live feed and live distance to the nearest wall", "displaying live feed from the Raspberry Pi camera module", and "developing a remote-controlled robot using Raspberry Pi". The chapter concludes with details on merging these three examples.

Chapter 5: Introduction to Image Processing

Chapter 5 of Learning Raspberry Pi introduces the reader to "the basics of image processing" and the OpenCV image processing library for the Raspberry Pi. The chapter's coverage includes outlining two approaches for installing OpenCV on the Raspberry Pi. The chapter then moves onto covering how to perform image processing with OpenCV. Two detailed examples finish off the chapter and illustrate the chapter's points: "creating time-lapse videos with the Raspberry Pi camera" and "developing a Twitter-controlled Raspberry Pi camera."

Chapter 6: Image Processing Algorithms

Learning Raspberry Pi's sixth chapter builds on its fifth chapter and covers "important image processing operations" such as the four types of image filtering supported by OpenCV and four "morphological operators." The chapter then introduces "core algorithms" (edge detection and background subtraction) before looking at "machine learning" with object detection, face detection, and eye detection. This chapter concludes with illustrative projects that provide concreteness to the topics presented in the chapter.

Chapter 7: Troubleshooting, Tips/Tricks, and Resources for Advanced Users

The title of this final chapter describes the three major areas it covers: troubleshooting, tips and tricks, and resources for additional information. The section on troubleshooting outlines some commonly encountered issues when using Raspberry Pi and describes how to address these. The tips and tricks section contains several short topics that provide details on how to accomplish small but commonly useful tasks and Raspberry Pi administration. The final section of this final chapter references and briefly describes three websites, an online magazine, and another book that provide useful additional information for working with a Raspberry Pi.

General Observations

  • Learning Raspberry Pi features useful tables and graphics that illustrate points well visually and the photographs are high definition and easy to see the components being discussed.
  • The text is easy-to-read even though the concepts can probably be a bit daunting for someone new to them.
  • The comprehensive code listings are black text on white background in the PDF version I reviewed with no line numbers and no color syntax.
  • Numerous project examples are provided that contain a high level of detail to illustrate the book's concepts.

Conclusion

I did not have time to work the examples as I read Learning Raspberry Pi, but my initial impression is that they are highly detailed and provide enough information for a person to copy what he or she reads and make the projects successful. Although there is much information regarding Raspberry Pi on the web, Learning Raspberry Pi provides a single source of well-flowing information to introduce one to the world of Raspberry Pi.

Monday, June 1, 2015

Book Review: CoffeeScript Application Development Cookbook

Mike Hatfield's CoffeeScript Application Development Cookbook (Packt Publishing, March 2015) has the subtitle, "Over 90 hands-on recipes to help you develop engaging applications using CoffeeScript." This book on CoffeeScript features eleven chapters spanning approximately 340 substantive pages. As its title suggests, this is a "cookbook" style of book. Its recipes begin by covering introductory items and then move into more specific and more involved CoffeeScript uses.

Preface

The Preface of CoffeeScript Application Development Cookbook briefly explains CoffeeScript's significance: "JavaScript has become one of the most widely supported programming languages in the world. Unfortunately, little has changed with JavaScript in this time and it is plagued with gotchas that can make developing a pure JavaScript system challenging." The Preface also outlines each chapter with a sentence or two overview and you can find similar high-level descriptions of the chapters of this book in the author's LinkedIn blog post My Book Has Been Published.

The "What you need for this book" section of the Preface states, "To use the code in this book, you will need a code editor of your choice, a web browser, and an Internet connection to download Node packages and other libraries or frameworks." The "Who this book is for" section states, "If you enjoy developing applications that can be run on desktop, tablet, and mobile devices without needing to learn platform-specific languages, this is the book for you."

Chapter 1: Getting Ready

CoffeeScript Application Development Cookbook's initial chapter emphasizes the appeal of CoffeeScript and includes the statement, "JavaScript, though very successful, can be a difficult language to work with." He adds, "These pitfalls found in the JavaScript language led Jeremy Ashkenas to create CoffeeScript, a language that attempts to expose the good parts of JavaScript in a simple way. CoffeeScript compiles into JavaScript and helps us avoid the bad parts of JavaScript." This section lists several compelling benefits of CoffeeScript; as I read these, I could not help but think that CoffeeScript brings some of the same advantages to the world of JavaScript that Groovy brings to the world of Java.

The chapter's (and book's) first recipe discusses downloading and installing the tools used in a CoffeeScript development environment including Node.js, CoffeeScript via Node Package Manager (npm) and the -g option, and editors/IDEs Sublime Text (Better CoffeeScript) and Visual Studio (Web Essentials).

The "A quick dive into CoffeeScript" recipe introduces key CoffeeScript syntax. This is an interesting discussion that shows how CoffeeScript can be more expressive than JavaScript (sometimes via adoption of syntax sugar from other languages like Ruby) and can even cover up some of the ugliest parts of JavaScript (such as comparison coercion). This rather lengthy recipe also demonstrates command-line use of the coffee command and application of the CoffeeScript REPL.

One recipe in the first chapter talks about why debugging CoffeeScript can be tricky and demonstrates using source maps with Chrome to map CoffeeScript code to compiled and executed JavaScript code being run in Chrome. Another recipe demonstrates use of Node Inspector with source maps to debug CoffeeScript on the server.

Chapter 2: Starting with the Basics

Although the first chapter introduced some syntax and concepts of CoffeeScript, it's Chapter 2 that provides a more comprehensive introduction to CoffeeScript syntax and language. The chapter introduces CoffeeScript's Ruby-like (and Groovy like) string interpolation, Groovy-like multi-line strings ("block strings") with three double quotes, overriding toString() in CoffeeScript for an object's default coercion value, regular expressions, and other text/String manipulation.

Recipes in Chapter 2 also describe working with numbers in CoffeeScript and demonstrate using CoffeeScript with JavaScript functions parseInt(), Math.random(), Math.floor(), and basic math operations. Other recipes in the second chapter cover use of dates and times in CoffeeScript, and use of CoffeeScript arrays.

I found the section of Chapter 2 on CoffeeScript classes to be particularly interesting. It states that compiled CoffeeScript classes become "constructor functions that are wrapped within a closure" to "keep private members private." I wrote about doing this directly in JavaScript in the post JavaScript Objects from a Java Developer Perspective and its looks like CoffeeScript makes it even easier to take advantage of approaches like these. This section also talks about defining methods on the CoffeeScript classes that "are compiled into functions on the object's prototype." I have described this JavaScript behavior in the posts JavaScript Objects from a Java Developer Perspective and A Java Developer's Perspective on the Power and Danger of JavaScript's Object Prototype.

Chapter 2's discussion of CoffeeScript classes includes discussion on and examples of using class inheritance and defining class-level (as opposed to instance level) variables and methods. JavaScript's 'this' keyword is notoriously tricky and the second chapter of CoffeeScript Application Development Cookbook discusses use of CoffeeScript's fat arrow (=>) to deal with this.

Chapter 3: Creating Client Applications

CoffeeScript Application Development Cookbook's third chapter discusses "popular frameworks and libraries that can be used with CoffeeScript when developing the user interfaces and client-side application code." The covered frameworks and libraries are jQuery, jQuery UI, Backbone, AngularJS, Socket.io, Underscore.js, Lightbox, and Jade. This chapter is filled with code listings. Most demonstrate these libraries and frameworks used in conjunction with CoffeeScript, but the nature of this integration is such that the examples seem more about introducing the frameworks and libraries than about CoffeeScript. In other words, much of Chapter 3's content would be as applicable to straight JavaScript as to CoffeeScript.

Chapter 4: Using Kendo UI for Desktop and Mobile Applications

Chapter 4 of CoffeeScript Application Development Cookbook introduces Telerik Kendo UI® Core, which the chapter describes as "an exciting open source framework from Telerik to implement user interfaces in pure HTML5, JavaScript, and CSS3." Recipes in this chapter detail downloading and referencing Kendo UI Core and applying Kendo UI Core widgets and mobile widgets. As is the case for Chapter 3, Chapter 4 has numerous code listings that demonstrate use of Kendo UI Core and Kendo UI Mobile with CoffeeScript, but many of these examples could be easily used for learning about Kendo UI used in conjunction with JavaScript directly if desired.

Chapter 5: Going Native with Cordova

CoffeeScript Application Development Cookbook's fifth chapter introduces Apache Cordova, which it defines as "a framework ... that allows you to wrap your web applications inside a native wrapper that can be packaged and made available via the various app marketplaces." It adds that "Cordova currently supports iOS, Android, Blackberry, Windows Phone, and FireFoxOS." Recipes in this chapter cover downloading Cordova via npm, creating a mobile application from Cordova's command-line tool, and using Cordova to access the device's camera, geolocation, contacts, and device information.

Chapter 6: Working with Databases

The sixth chapter of CoffeeScript Application Development Cookbook "how to use CoffeeScript to perform common create, read, update, and delete (CRUD) operations" against datastores SQLite, Redis, MongoDB, and CouchDB. The chapter's recipes focus on performance of CRUD operations against these various types of datastores from CoffeeScript.

Chapter 7: Building Application Services

The recipes of Chapter 7 describe using "CoffeeScript to perform common Internet-related tasks and create RESTful services to be used by our applications." These recipes cover things such as encoding and decoding "binary and base64-encoded files" (atob, btoa, fs), working with domain name services (dns) and IP addresses, parsing URLs (url), creating RESTful web services (express.js), and creating package configuration files with npm init. The chapter also introduces the Chrome extension Postman.

Chapter 8: Using External Services

Chapter 8's recipes focus on how to use third-party services such as Amazon S3, Twilio, GeoNames, email, and FTP in CoffeeScript applications. The chapter also introduces REST Client for Node.js, nodemailer, and, node-ftp.

Chapter 9: Testing Our Applications

Chapter 9 of CoffeeScript Application Development Cookbook describes "various methods of testing our CoffeeScript applications using a variety of techniques and libraries" such as QUnit, Mocha, Zombie.js, Sinon.js, Bower package manager, and live-server. As the recipes are presented, common testing concepts are discussed such as test-driven development and test doubles. This chapter presents numerous screen snapshots to illustrate test results in the browser and console.

Chapter 10: Hosting Our Web Application

Recipes in the tenth chapter of CoffeeScript Application Development Cookbook describe using Grunt to prepare CoffeeScript applications for deployment and then deploying those applications to "both the Heroku and Microsoft Azure cloud platforms." The Grunt-related recipes demonstrate downloading and installing Grunt and using Grunt to compile CoffeeScript into JavaScript and to minify the compiled JavaScript. The recipes on deploying to Heroku and Azure demonstrate creating accounts on those providers and deploying CoffeeScript applications to them.

Chapter 11: Scripting for DevOps

The final chapter of CoffeeScript Application Development Cookbook looks at "ways that DevOps can use CoffeeScript to perform some common tasks." Recipes in this chapter demonstrate application of child_process.exec() and child_process.spawn for executing shell commands from CoffeeScript, manipulating files in CoffeeScript with node's fs and fs-extra modules, archiving files and directories with archiver, parsing command-separated values files with node-csv, parsing fixed-width text files with moment.js and accounting.js, formatting dates with moment.js, formatting numbers with accounting.js, and padding and aligning output.

General Observations

  • As described in this review, CoffeeScript Application Development Cookbook covers a wide spectrum of technologies and concepts associated with CoffeeScript in addition to introducing and covering CoffeeScript itself.
    • Numerous open source JavaScript libraries and frameworks are presented and demonstrated that can be used with CoffeeScript or JavaScript.
    • Chapters 1, 2, 9, and 11 are the most CoffeeScript focused (though even some of them cover related technologies) and the remaining chapters emphasize related libraries and frameworks, what they are, and how they can be used from CoffeeScript code.
    • CoffeeScript Application Development Cookbook references Node.js several times in multiple recipes and contexts. This seems appropriate for a modern JavaScript (or in this case, CoffeeScript) book.
    • Debugging and unit testing of CoffeeScript code are covered in this book along with other CoffeeScript development topics.
  • The screen snapshots in CoffeeScript Application Development Cookbook are generally clear and illustrate well what's being described.
  • The text of CoffeeScript Application Development Cookbook is easy to read and generally flows well. There are some typos, but I never found any of them to prevent me from understanding what was being conveyed.
  • The code listings are generally short enough to be readable and focus on the point being made. These listings are black text on white background with no color syntax and no line numbers.
  • CoffeeScript Application Development Cookbook seems best suited for those who have some (even if it's minor) JavaScript experience and are looking for an introductory level book on CoffeeScript. Although the book is recipe-based, it's recipes are ordered and presented in such a way that, if read cover to cover, are fairly introductory and build on each other without requiring reading the earlier recipes.

Conclusion

CoffeeScript Application Development Cookbook does a nice job of introducing CoffeeScript and explaining how it can make JavaScript development easier, especially for those more comfortable with other class-based object-oriented languages. A few chapters focus on CoffeeScript, but most chapters cover a wide spectrum of related technologies and concepts. By covering use of numerous open source JavaScript libraries and framworks with CoffeeScript, CoffeeScript Application Development Cookbook repeatedly reminds the reader that one of the significant advantages of CoffeeScript is the ability to use JavaScript libraries and frameworks even while taking advantage of CoffeeScript's easier syntax and more consistent concepts.